Showing posts with label briddon. Show all posts

Monday, March 12, 2012

Interiors in N


There are many books to choose from
I've been playing around with more interior paste ups and they seem to be working well. What I've found is that the details are really nice to have on the interiors even though the windows may not allow for a full view inside. It looks like SOMETHING is going on in there and that sells it more than an empty shell.  The smaller size also allows for being a bit sloppy with scale. Some items just are not recognizable through the windows, so some of the items are just wall texture over actual items.
WHAT?! Books, books and...meat? :)
This series of buildings will be used for wiring experiments, so the interiors may be more visible than they have been in past models. First I need to figure out HOW to wire something up, then I'll play with the actual lights to get the effect I want. While I like this buildings, I'm not super attached to them, so I'll play with the lighting here and transfer that knowledge to Soyokaze when I wire that up for light.

Friday, March 2, 2012

Time to name OLD TOWN

Well, it's time to give OLD TOWN a proper name! It's starting to really take shape, so I thought that a proper, Japanese name could now be given to it.
I've written a friend from Japan and I told her what I was looking for in a name and she came up with some awesome ones. (THANKS MICHAL!)

Shizuka (quiet)
Heion (serenity)
Yasuragi (calm)
Soyokaze (gentle wind)

Leave a comment if one of these stands out for you - I'd love feedback! 


Thursday, February 9, 2012

Additional Station photos


The Ryokō Station is getting more and more busy. The new residential section of Briddon over the hill is making the morning commute a little more crowded, however the addition of a few trains has helped matters greatly.


http://www.flickr.com/photos/malcojojo/sets/72157627072380183/

Additional Work Layout Photos

I've gone through and taken some more photos of my work layout. We just found out we have to MOVE at the end of March, so the layout will have to be packed up for moving, sadly.
Even more crazy making is having to make sure I get another office space! I need to have a space where I can re-set the ole work layout or I'll be really upset. :)


More photos up on FLICKR: http://www.flickr.com/photos/malcojojo/sets/72157628630757331/


The STARCUP COFFEE spot! :)
Morning tram out to Old Town


Apollo Gas - $3.00/gallon when paying with cash!

Tuesday, February 7, 2012

Old Town Hillside Building Plan

More plans. More sketches.

I got a great comment on the N SCALE LIMITED forum when I posted something about my Old Town layout plan. Someone said, "These shots are great. Are you going to try to show the same thing on your layout?"


YES! That's exactly what I wanted to do, but I had not thought about it. I knew I loved the image above, but wasn't thinking about getting the same view in my layout. Originally, I had the building rows in line t the edge of the layout.  So, you would have to be on the side of the layout to get the view shown above. Thinking about looking down the street, I shifted the houses so that they were on the 45. This way, the viewer will be able to "look up the street" when standing in front of the set.


Lighting would be cool, but I'm not really ready to take it on. I may work the small, battery powered TOMYTEC light setup I have into the hillside, however. It would be so nice to have a soft, yellow glow coming out of the buildings at dusk! Worse case is I just abandon it once I have it in place. I'm not using it now anyway, so I might as well give it a shot.

QUESTION:
I'm wondering what the best system for building out the hillside is for my lack of a work area system.

My idea right now is using foam core layers to build up the hillside, then I'd lay plaster gauze over that to create the hill itself. The buildings would be stair-stepped into the hillside so they are level and the "small streets" called out in the top image would be sloped. But, is this the best system?
I could go with more styrofoam and just carve it down.
Or, there is a builder foam I could carve down into a hillside as well. "Gator Foam" has been called out as a good material as well.

Any comments here would be appreciated! I have a work session planned for the 16th and 17th and would love to have a game plan called out so i can get some base work in!


Tuesday, January 24, 2012

Old Town Action Plan

Hello again to all those playing at home. :)
I have a tighter action plan for Old Town worked out. Of course, this may change within the hour, but it's nice to have SOMETHING down.
The board is working out well. My original thought about needing more structures is on hold. I think there may be enough to get the visual density I want to achieve down as it stands now, so I'm going to hold off on additions for now. But...you know...I already have them picked out and my birthday IS coming up...so...yeah...I'll end up buying more. :)


http://www.1999.co.jp/eng/10160555 Brewery Buildings
http://www.1999.co.jp/eng/10108828 Tomytec Buildings
http://www.1999.co.jp/eng/10104758 Tomytec stores

And, eventually, I want to expand a bit to include a fishing port....

http://www.1999.co.jp/eng/10070960 

But, for now, the breakdown is someone clear and simple. Some of the areas of note are:

01. The temple area is now raised - set on a styrofoam base. The wall area of the base will have this stone wall look. 

03. I really love the "Town Square" feel of this image and would like to translate it into my layout.

07. & 08. The feeling of this image is something else I'd like to capture. People strolling, shopping and taking photos. Small streets and pathways that keep things close and "small town" feeling.

And I've been snagging lots of photos so I can try to match weathering and how the buildings are laid out. I want to make sure I have several elevations as well. This will help to break up the overall landscape. In shot 12., the raised foundation style will help to get that split in elevation.

Exciting stuff!

Comments and suggestions welcome!

<><>

Monday, January 23, 2012

Soyokaze Stories: A Visitor


Old Town station

Old Town parking

From the notebook of Ken Kutaragi

"I'm glad I took the train instead of driving. The experience was fantastic and the small station by the temple was endearing. The tram ride took me through some of the most beautiful countryside I've seen and it seems that it took about the same time it would have taken on the Nittsu bus from downtown, but it was far less crowded and confined feeling.

I plan to revisit the restaurant Kogane no and hope to see Mrs. Teshigawara when I'm there. (Though, I must admit that it's her daughter I'd really like to see!) The food was amazing and the view of the Temple at sunset is something out of dreams.

Staying for the night may have been the best decision I've made all week. The fresh air and the sake have made me homesick. I wonder if it's raining in Saitama right now. "

Translation: Kate Marx-Cooper

Boats

Mr. Shimabukuro got his last three boats delivered as the sun started to fall. Mrs. Teshigawara was nice enough to let him store the boats on the side of her restaurant until he works out the additional storage needed.  Shimabukuro will open his boat rental space late this winter.

:)

Old Town - Revised


The model train hobby seems to be mostly about planning and revisions to said plans - about 80% by my rough calculations. :)

Old Town is being re-thought again. The original plan was to have the Old Town section laid out on KATO road plates. However, after taking a look at some locations in Japan, the organized and wide space the plates offered didn't match the vision I had or the real locations I scouted. So, another revision was needed to match my minds eye.

I snagged a plywood sheet from Home Depot and had it cut down to fit on my current dresser location. This was the best option right now - the space was already being used for the setup and - since we've signed a year lease recently - we're going to be here for at least a year and the magical, future space of my combined layout isn't happening any time soon.


This new area will allow for me to build out everything from scratch. I'll have smaller street areas, walkways, lots of foliage areas, a raised section for the temple area made from 1" styrene sheet and will have the look I really wanted for the Old Town section. I think this new revision will also mean re-doing the parking lot. I may just hack it in half and manage it that way.

All in all, I'm excited about this new direction. I'm trying not to let my excitement about it drive me too fast, however. I think that keeping a slow pace and thinking things through will give me the best results. There are a few break out spots in my life coming up where I'll have a block of time to work on the project, so I'll ramp up to those spots as they come up.

If you have comments or suggestions, please feel free to toss them out there! I'd appreciate anything that might help out in this process.

Cheers

<><>

Thursday, January 12, 2012

Old Town - The boat rental spot


Old Town is getting an addition to it's tourist trade. A pond area where people can rent paddle boats and rowboats. I'm setting the area up so that there is a run of shops, restaurants and even a little farm (maybe one that produces fresh produce for the restaurant next door?) that move out to the end of the Old Town section where the pond will start. Right now, it will just be a hint of the pond area with the building that sells tickets for it and lots of action with people waiting in line, walking out to the boats and in boats heading out. It should be a fun addition.

I was going to use straight styrene for the project, but I think that I will actually use a blend of styrene and foam core to get the look I want.

TOMYTEC buildings are pictured primarily. The docks, boats and and building comes in a set.

Visual Scene Accessory 080 Boat pier 


Monday, January 9, 2012

Around Downtown: Hotel Indigo


Peace.
Calm.
Luxury.

Briddon: Plotting and Planning


I continue to plan and plot the eventual combining of my OLD TOWN and DOWNTOWN sections with a span of transition between the two and various industries throughout the set.  It's a fun distraction during the day. :)  I keep drawing things up and looking items up on the internet - fueling the fire that boils inside me to make this happen one day.

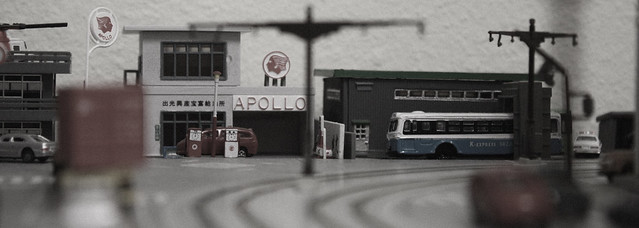
Currently, I have two distinct sections - Old Town at home on two dressers and Downtown at work on a utility table I have set up in my office. As I've said before, I eventually want to combine the two into one large layout. The dream.

I have the basic feel of the two sections in mind as follows.

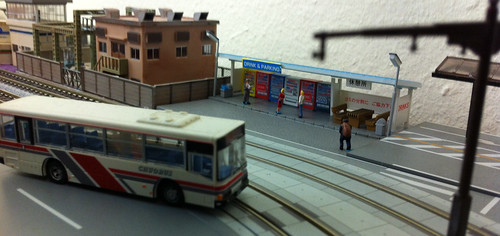
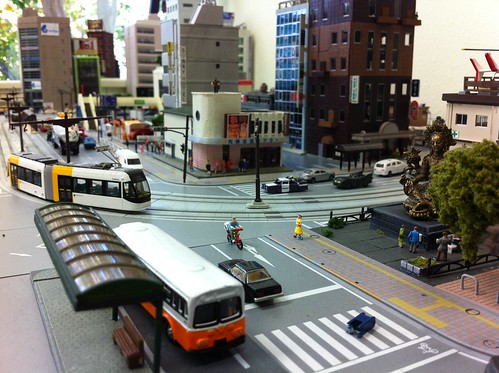
Old Town is a tourist spot, really. People would come there to visit and sample a little Asuka and Nara Japanese architecture, food and entertainments. Ideal for families, Old Town will be a lush, open space with lots of trees and fresh air.

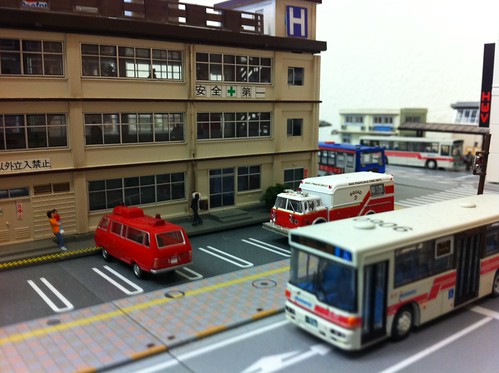
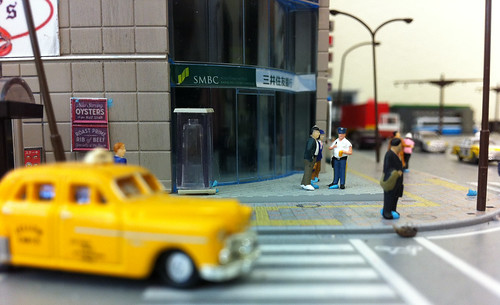
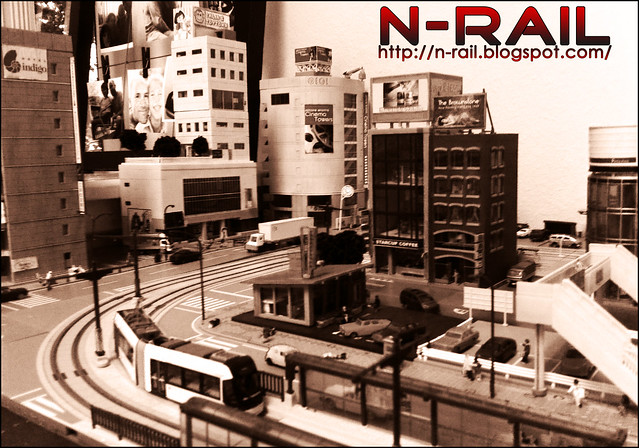
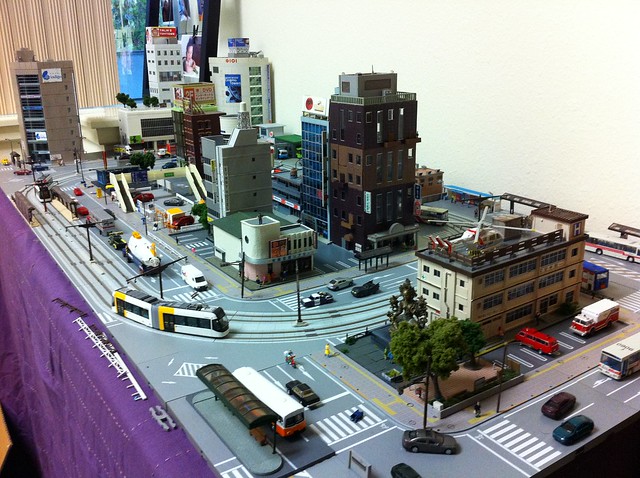
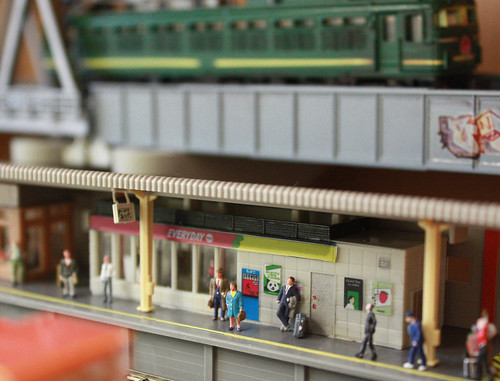
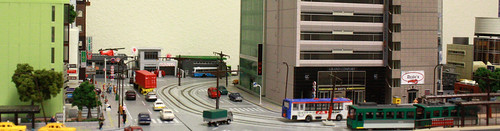
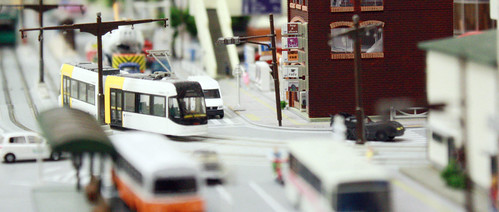
Downtown is a business filled, busy space with many tall buildings and lots of people and things packed into the space. (This will take a LOT of time to build out - ideal for a small layout) I'm basing it on the space and layout of Tokyo - compact and filled. This will provide a lot of visual eye candy as we see people going about their busy, City lifestyles. I really need a little more height and variance along with more small details. And, of course, lighting - something I'm both excited by and terrified of getting involved in! :)

The Transition between the two areas will be open space with some detail and industries. The main one will be an open water area that will have either fishing or some port activities going on. The fishing seems easier and more in line with the feel of the layout, so that's where I'm leaning. Though, I love the idea of doing something like this found on QUINNTOPIA's blog. I love the feel of the large ship in the scene. Small details and "action" spots will make the area pop, I believe.

I want to have some sort of background element wall mural - maybe with lights as well for cool, night time viewing - and a hill area about the Old Town section with some residential areas overlooking the valley that Old Town lives in. Just a hint of some residential settlement over the hills. 

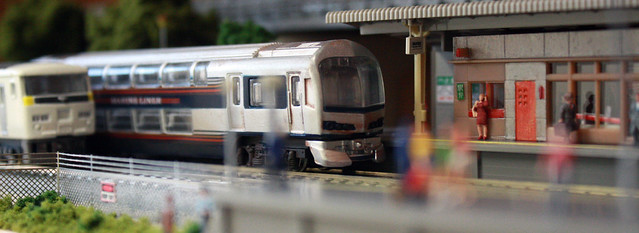
I'm a structure guy and the trains are almost secondary. I love to see them rolling around, but my Portram broke a while back and I've yet to fix it. It's been months. But, it sits there next to a dummy tram - a dead prop - and that seems to work for me.  I want to have a fun, older tram rolling from Old Town to Downtown, but also want a modern JR train rolling along the outside. The JR will be underground Downtown and above ground around Old Town. (Different from what's pictured above.) I think it makes more sense to have it underground in the City, but seeing photos of Japan, this is still TBD.


For now, I continue to detail out what I have, work on small non-Japanese modules for fun, and to plan for a bright future in the hobby.

My lovely wife has a vision that I hold dear. I may have mentioned it already. She says she had this vision of us eventually owning a home with a small bar structure in back. People would come to the door as she's playing with the kids (or grand kids at this rate :) ) and ask for me. She points around the side of the house and says, "He's out back in the barn. Go on around." There in the barn is some wild, N scale masterpiece that people come from miles away to look at. I'm there working and welcome them in to take a look around and ask questions or take photos.

I love that vision. :)


OLD TOWN look and feel

OLD TOWN look and feel. Many plants and trees

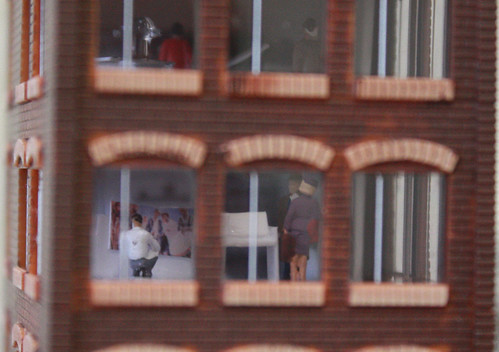
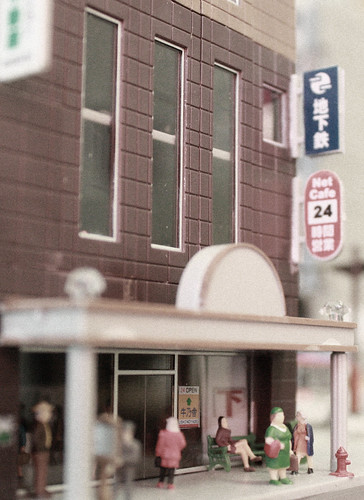
DOWNTOWN look and feel. Compact and hyper detailed


Comments, questions and suggestions welcome, as always!

<>

Monday, November 21, 2011

Parking Payment Kiosk - Detailed


I got my Parking Payment Kiosk done - I really like the results. Now I just need to build out the actual parking lot this goes into. Maybe sometime over the holiday break. Hmmmm...

The main structure was created using styrene, plastic model parts I had laying around and detail stickers from old KATO kits I purchased a while back. 

Of course, the Kanji is a complete unknown and is bound to be completely wrong, but it has the look I wanted. I'll be fine as long as no Kanji readers show up. :)

Comments welcome!

(Note: The red bar next to it is a wall that has yet to be completed.)


Sunday, November 20, 2011

Statue and Payment Center


I've been working with styrene again and still love it. Love it more and more each time I use it, really. Today I was doing more work with those panels for the KATO roadbed sections (coming together well) and I saw some small shavings laying in a small pile on the table. It dawned on me that my desire to have some sort of sculpture could happen with the styrene as well - avoiding another purchase. I made the sculpture piece on the left above and think it will look pretty cool when painted and detailed out. 
Then I thought about the parking area I want to have in the Old Town area and the small shed space I planned on having as a parking payment center. I was going to buy something, but thought the styrene was the way to go there as well. So, I designed up the payment center on the right above. It will have KATO supplied stickers that look like vending spots, a map space on the back and will be painted and detailed out as well. 

I love being able to just make what I want for the set even if it is the simple stuff at this point. I figure I've saved about $15 or $20 bucks tonight alone.  Not bad. :)

Wednesday, November 16, 2011

Styrene Filler: Paint Up


The paint up is rolling right along save one small error. I was rushing and used enamel over the acrylic paint I started using. Second time I've done that - I really need to separate my paints!  (...and stop trying to watch BIG BANG THEORY while painting, evidently...)   :)

I dig the result, however.
 
The stair area and planter boxes are working out well. I've used the styrene planter box build up before and it works with the scale and is really easy to do.

Once I get people and benches and the like into the scene, I think it will have the action and life that I want to have going in my Old Town section. Additional painting details will be added once this layer drys, then I'll start looking at people and other detail parts.

Styrene Filler Project


I'm working on my Old Town section a bit finally!

I've made the choice to use the gray plates for the Downtown section and the tan plates for the Old Town section. MUCH better with the unified look and feel to the bases of each section. It was starting to look very strange due to the major differences in color and height.  The issue now is the plate itself.

You can see to the left of Image A. that there are clips that hold the plates together. The clips fit into hols in the surface. Event when the clips are in place, the difference is very noticeable.  Then there's the color of the plate itself. The tan makes the whole look very toy-like, not like dirt. I'm using the cover method to deal with the situation, but using styrene instead of ballast this time.

Styrene is awesome. I've been using it to build floors for my empty shell buildings and bases, so it made sense to use it for this filling in project. And, while I could have just cut big squares to fill in, I thought it would be more interesting to create a little more depth to the scene in general.

Image C. shows what will be a park area in the Old Town verse. I plan on having a tree, benches and people selling food. Image D. shows the height I'm adding and the "stairs" and raised areas where additional greenery will reside.

First, however, I need to paint up the styrene so it's not polar white. :)

I think this will work rather well once it's all dolled up. I have about four plain sections to work on and some other spots where the building bases don't cover the whole thing.


Sunday, November 6, 2011

Project: Building Basher

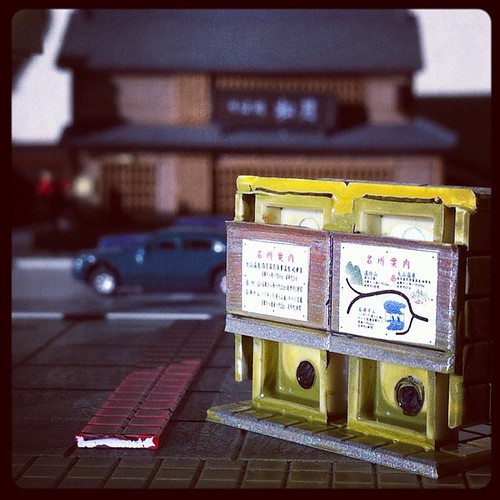
I'm trying to get the nerve and tool set to saw the building on the right in half after the first story area and slip it onto the top of the building on the left. Then, I'd build out the roof area on both buildings. Might be cool. I have a corner shop building that might replace one of the structures as well. I think the sawing aspect is a bit daunting. I just need the right tool set.

This project will be back burner-ed, I think. Maybe I'll take it up with us when we go on holiday in the snow. I don't ski and my daughter takes a 1.5 hour nap in the morning at times. Hmmmm.... :)

Storyline: Temple News

Good news for the people of Old Town!

Funds have been diverted and it looks like the remodeling and town revisions will be going through as planned. The schedule is tight and the process will be disruptive for sure, but the new look of Old Town will be well worth it. Tourist lines and additional bus routes will help keep Old Town thriving.

And, the plan to move the Hiburi Temple area to Osaka has been overturned - the temple will be staying in Old Town after all.

Businesses in Old Town will remain open for the majority of the remodel and city renovation.

~~~BRIDDON NEWS WIRE~~~~

Office Layout: Downtown


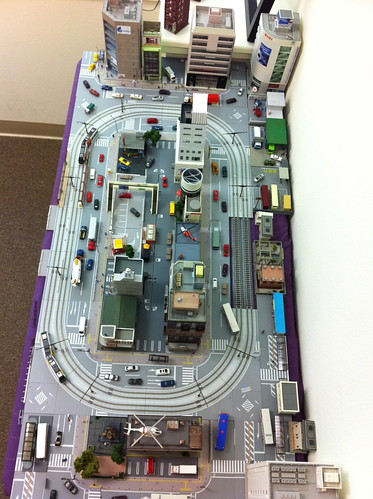
I was sitting in my office on a pone call that didn't really involve me anymore and I glanced over at my office layout. "ESCAPE!" I thought, so I moved over to the set (thanks wireless phone headset!) and had a look at my little empire I have going there. I have to say, I was a bit shocked. It was looking pretty good.

It snuck up on me - the fact that the layout was so complete. I had stopped buying buildings a while back and my main focus has been detailing and figures. When I took a look, I was pleased with the progress to date.

The overall layout is not bad. I like it for the time being. Large buildings at the North end, smaller buildings in the center with a bus station towards the back. The Downtown area of Briddon has a cineplex for showing mainstream movies and a smaller venue for classics like 8 1/2.

There's a helipad at the hospital for emergencies, a few hotels, a government office and a few small businesses. They even have places to eat ranging from a burger joint to a fancy restaurant called DRAKE'S in the downstairs area of the ultra-fancy INDIGO HOTEL. (My son and daughter.) :)

My 14 month old has a toy store named after her - Talia's Toy Town.

But, I think the thing I'm most interested in is the fact that everything came together slowly and calmly. There was planning involved, but it wasn't painful. I love that aspect of the layout coming together. It went from "I really don't have space for a layout" to "I have an office now - I can put some sort of train there" to "Whoa...I love this." Really nice. But, far from done, of course.


The bus terminal area.


The heliport hospital.


Waiting at THE INDIGO HOTEL for lunch at DRAKE'S. :)
As you can see, I've used blue tack for the people all over the layout. This will be replaced later - slowly over the course of months, most likely - with small plastic sheets that the figures will be glued to. This will be less obvious for one and will still allow me to move figures around at will. I've played with the process for the Woodland Scenic Picketers and it works really well. True, it takes some time, but that's the beauty of this layout now - small details and the like. That's what I want to keep me busy in the hobby.

My plan of action is to go in and do more detail work on the set. I've started to focus on people, continuing to populate empty buildings with people and floors and making "action spots" where things are happening. The bus terminal area is one of the featured spots. I want to have people waiting and getting dropped off for bus travel.

I also want to continue making this very Japanese. I had a fantastic suggestion from Tom Barbalet of the MODEL RAIL RADIO podcast. He suggested using GOOGLE MAPS and STREET VIEW to see areas of Japan for my modeling. It is working really well and actually seeing where these building and street styles are coming from is a huge value.

The hardest part about the layout being at work is...well...it's at work. If I have the desire to work on things, I need to remember to bring them home. Having a set at home is nice. It keeps a balance going. (Pictures to follow later)

YOU CAN VIEW MORE IMAGES HERE:
http://www.flickr.com/photos/malcojojo/sets/72157627943313845/

Comments welcome!


~~~

Monday, October 17, 2011

Office Layout Revised


I've revised my office layout yet again. It keeps me out of trouble and manages to get me a little model rail hobby in. It seems to be the only time I get these days, honestly.

I followed through on my plan to bring my Kato Unitram to work, take out all the tan roadbed parts, and keep the gray Unitram look going at work. I now have the mega layout at work, taking up the whole utility table i have it set up on right now.

I have two more large buildings that I'll bring back to work (I took them home to detail them, but just don't make time for it) and once they are here I'll do one last bit of arrangement to make everything visible and interesting.

As always, I'm faced with the issue that I want to be able to see everything from the front, so it tends to have a somewhat unnatural feel to the whole of it. You just don't tend to see nothing but the fronts of buildings unless you're at someplace like Disneyland. :) However, I'm sure I'll be able to come up with some arrangement that works for me.

Now, to take the tan road plates home and reset my Old Town layout!

Some additional photos can be found here:
http://www.flickr.com/photos/malcojojo/sets/72157626200891263/