Showing posts with label road. Show all posts

Wednesday, July 8, 2015

Hozukyo and Sagano


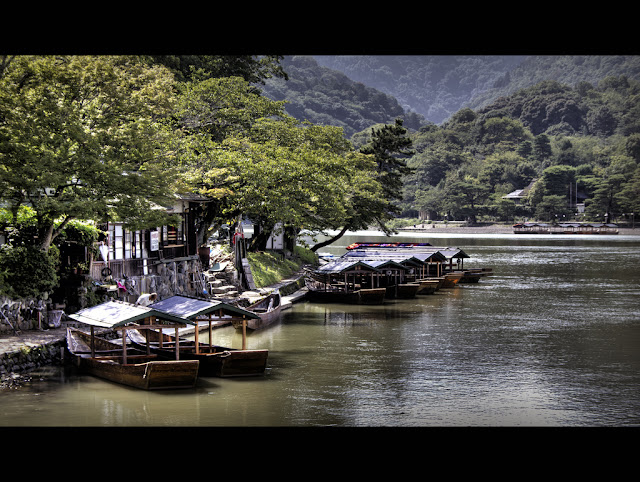
More on the reference area I found on YouTube. My friend Rios Tam was VERY helpful - he gave me the direct name of the areas in my reference search so it's making reference photo searching SO easy!

Again, here we are in the model railroad world making friends all over the planet that are helping making the hobby even more fun and interesting.

The areas are called HOZUKYO and SAGANO in Japan and are now on my list of places to visit. They are beautiful areas and they have many aspects I would love to slip into the new layout extension area. While I won't be able to pack EVERYTHING in, these areas have some items that I'll include for sure. The trees and tracks winding through the hillside area is a must. Small detail elements that are in the area like shrines and water-side buildings might be included as well.

I'm super excited about this section now. Even more than I was already. Now I just need to come up with a name and story for the area. The hard part will be slipping the factory into the space. I want to have trees and nature, but I also want to have the factory area.

It turns out that the Takahama Nuclear Power Plant has the same "factory in nature look", so that's what I'll be referencing for my factory area.


Things are shaping up. I can't wait to get started on the section again. (After work, jury duty, the vacation away and a freelance gig I have rolling in.....)


This sort of reference image hunting is fantastic for a layout - especially with freelance layout planning. I'm able to sort of pick and choose what I'd like to include and what I don't. Some of the real areas make it far easier to plan things out because you can see what's really there instead of trying to just imagine what an area might be like.

The next thing I want to do it roam via GOOGLE MAPS to see if there are more reference images I can pull from from these areas or the areas around them. SUPER helpful.

Again, a huge thanks to Rios for spotting the area and passing the names over to me. It saved me a lot of guessing. :)

Friday, October 24, 2014

Cool cardstock modeling and street work

My friend Rios posted a few updates from this modeler.


The site is in Japanese, but the Chrome browser can translate if you're interested in reading the blog. The images are fantastic on their own.     http://obishi.blog.fc2.com/


He's doing work with card stock on a carved foam base. Really interesting stuff. He's also doing some great weathering on the buildings he's putting together. When they are placed and set, they look fantastic.


I love the carved stone walkways as well. It's a great look. I was wondering if I could get foam and have it thin enough to do something similar, but I think it wouldn't play correctly in N scale. I'm still sorting out options for sidewalks and walkways that don't involve massive purchases of pre-made items.
This is a great exercise in planning and thinking things through. The streets need to be planned out and worked so they make sense. Then there are the buildings and their footprints and making them work with the area as well. Then you need to factor in sidewalk areas to make sure they are working, too.

I love this style of working - removing material instead of just building things up. Cool stuff.


All in all, it's great to see more of what is going on overseas in this area.

http://obishi.blog.fc2.com/


 And I love the look of the street scenes. They have a painterly texture to them that I really enjoy.


Friday, October 3, 2014

Those who can't do, blog


Those who can't do, blog. :)

And, they barely do that. I started this post a few weeks ago and uploaded images, then more things came up and I dropped it yet again. I managed to get 20 minutes of painting in last night and it was grand. LOL  It's been a crazy couple of weeks with work and home items jumping me at every turn. So, I sit and glance at my layout on meetings and think about what my next steps will be when time frees up a bit. (Might even be MONDAY! WHOOT! PTO!)

Things were moving rather well there for a while. Yes, it's not a race, but it was nice to see some of the larger items come together. Some of the little scenes and things are nice to glance over.


Once more people are introduced, I'll be really happy. However, I want to do several more layers before even thinking about the people on 70% of my layout.  I'm looking at sidewalk production and more Shizuka shifting around to accommodate some ideas I have brewing.

Soyokaze Hill (below) and the area around it will be a lot of fun to detail out. I want to add a lot of scenery details and people strolling around doing various tasks. 


Small details like this rooftop will be hidden throughout the layout.

Soyokaze Harbor will be fun to detail as well. I want to paint the track and have lots of action with vehicles and people all over the scene. Street details will be another interesting challenge layout wide - making sure I have the right signs in place for the right areas.


More more more! I love these scenes! :)


My daughter is a sweetheart. She loves the train because I love the train. I don't push it on her at all, but she'll come and play with the layout I have for her under my layout and will move trains and cars and buildings around like some giant. It's cute. I don't know if she'll want to help in the same way some of the other MODEL RAIL RADIO kids are helping their parents, but the fact that she'll let me hold her and point out what I'm doing on the layout - rapt attention and real listening going on - is a huge thing for me. No one else in my family can do that for me for very long without their eyes going glassy and rolling up into their skulls! hehehehe  :::sigh::::


I'm spending some time thinking through the Soyokaze Town area. It's the thing I'm least happy with at the moment. I think - as I've said before - that I need to look at more reference material to sort out the layout of the town. I like the station area (below). I think that's working for the most part save the addition of more details and people.


The work I put in on the lower part of Soyokaze Hill makes me happy. :)


Devil's in the details. TomyTec and Tomix make the detailing a bit easier! :)


I've finally managed to chill out on my bus obsession. At least for now. :)  I need more standard autos and specially, Japanese items like three wheelers now. I have a little tax money that I've gotten for something special, but I'm not sure if I'll get more people and autos for later or try to make my subway section a reality. I'm leaning towards the subway.....


SUBWAY QUESTION:


The subway is a bit of a head scratcher.  I want to have it run under the current layout through some sort of suspended architecture that I don't need to destroy my current progress to install. I thought about just cutting another piece of plywood (like I used for the deck) and just mounting it under the current setup using some sort of hardware bolted under the current framing. But, then I thought that having 2x4-like runners under it would be a bit less clunky.

QUESTION for the readers:  Is there something I'm overlooking here that already exists that I can make use of? Or, an example of this sort of second deck I can pull from? Comments more than welcome! I'm not a builder, I'm a lover...of structures and scenes. :)   There are no motors or wires under the layout, so I have space to play around under there.

Well...that's my time for today! Back to the grinder! :)

Cheers, All!

Monday, July 21, 2014

Tomytec Bus Sytem in action


I really enjoy this TomyTec bus system.
Seeing the wheels turn and the bus moving through the landscape makes me happy. :)
However, I still get the same feeling I get when i see trains running.

"We aren't the people and cars moving? That's just...odd."  hehehehe  

However, this really does add to the scenery and the fun of this little scene. Being able to run the buses through the winding roadways, having them stop at bus stops and over little humps that make them bounce along is a lot of fun!


TRANSLATED FROM YouTube:

Published on Jun 26, 2013
N gauge size of Tommy Tech bus model (scale 1:150) "The bus collection to commemorate the 10th anniversary "(Basukore) Release," Basukore complete (stock) Neko Publishing June 28 is all manual " It is published in. 
 As one of the articles inside is also a featured product of Tommy Tech "Basukore travel system I have posted using the "" diorama of the Miura Peninsula bus run around "the (900 × 600mm) has.The system is intended that self-propelled on the road the bus model has been determined, the easier you have them traveling is what try to run in fact poetry. In this study, the running scene of the bus I have created a video with a focus. Please visit along with the magazine. 
Diorama Craft: Shimbo Mitsutoshi

Friday, May 23, 2014

May Progress - Cities


Just a quick update - mostly to avoid dealing with issues at work. :)

SHIZUKA

Shizuka is shaping up. I have space for some nice scenic elements now along with a few more scratched built buildings if I choose to take that task on. I might just do some more checkbook modeling and kitbash some structures instead of doing it from scratch. We'll see.


The light space to the front of the photo above will have a little roundabout style garden space. Something like this photo.


I'd like to see the crosswalks and garden style intersection spot carried out like this. It'll make a nice addition, as I've said before.

I've noticed that Shizuka is looking a little sparse, so I think additional buildings and the like will be called for. While I want the area to have space for walkways, back alley details and the like, I want it to also have the prototypical dense quality Japan cities have.

The back side of Shizuka where I had some shopping areas is getting worked out. I dropped in a large hillside area to raise the area up. A walking bridge may be added at a later date spanning the area over the tracks and into the city. The area will be fenced or walled appropriately and will have road details and various other nuggets. This can be worked on in a modular way as well, so I can bring the whole section inside to work on and then place it afterwards in the same way the temple area was handled.
Several apartments are located on the hill along with the hospital and parking area.

I swapped in double tracks between the hill and the city. (above image) Some of this will be replaced with Kato Unitrack shortly.


SOYOKAZE

Soyokaze is starting to really look the part. I'm happy with the progress.
Following up with what I created for the area lore, Soyokaze and Shizuka are very easy to get to via rail, bus and taxi (for those with the cash to spend on a taxi all that way!) I've added another station area - mostly because I WAY over-purchased when it came to station pads, so I wanted to use at least ONE of them somewhere! hehehe  (Let me know if you need one - I'll sell it cheap. :::grin:::)

I've done some more rearranging as well - shuffling buildings this way and that and planning for this weekends road paving. At least, that's the intent. We'll see if that happens.

All in all things are looking good and the arrangement will allow for a lot of good detail, action and fun scene additions. 


SOYOKAZE HARBOR, TEMPLE AND VILLAGE

There really isn't much to report with these areas. The Village will have a solid, concrete slab looking base and I plan to do at least one if not two more rounds of rearrange and swap sessions after it's poured. I found that I might have enough space to have both a series of small access roadways through the village and for the small street market items I had on my previous layout area. I was rather happy about that. I like the idea of a little street festival in the village. Fresh food smells and gifts being sold to visitors. Another great scene op.


The harbor area is waiting for some additional street level details, but other than that, I have no new plans for the near future other than more figures and scene work. I think it's the most complete of the areas, really, so it can wait a while longer. :)


However I did get one element I'm excited about doing before long. I picked up that whale for a scenic element in the harbor and I think it's going to make a great addition once it's mounted, weathered and placed. It will add to the lore of Soyokaze fishing being "Whale Friendly".


Prototype :)


IN OTHER NEWS

I finally got around to setting up a little roundy-round for my 3yr old with my spare track. She is very excited about the process and has fun racing the little BANDAI tram around FAR too fast. :)  We are planning to paint it pink and purple as per her specs. Photos to follow, of course.

She also gets to paint the base board, figure out where her roads will be and decide where her building areas will be located - all of which she wants to do today when we speak about it. "Why can't we finish it today?"  I'm sure there are many hobby folks out there in the world saying the same thing right now - "Why can't this just be done so I can start playing?!"  I'm going to try to speed up certain portions of the process for her, but I am aiming on having her do some of the work, too, while I work with her. :)


Halloween may be a ways off, but I thought that this DEPARTMENT 56 item might make a PERFECT decoration for the house. Saving has begun - the sucker is expensive! But...you know...cool, too.


Carry on, Hobby Folks!

Saturday, May 3, 2014

Soyokaze Bridge buidling - Phases 01 and 02


As I've said in previous posts, I've finally come up with a reason for the trestle at the front of my layout. And, that lead to another bridge creation - this time for cars and foot traffic.

Naze hashi  
なぜ

(Why Bridge)  :)

I did a series of rough sketches to get the design down. The base of the bridge is foam core with styrene accents and supporting structures.


Additional "cheap" styrofoam was  used as the under support structure.


 I'm going to paint up the area below the bridge to represent a sort of estuary or inlet.


 The design is simple, but I like the feeling - foot traffic on one side and autos on the other.


I did the first round of building, then sprayed the whole bridge with a gray. The arches will be painted in a traditional red.


I also had to do a double check in the space afterwards. After seeing the bridge in place, the bridge seemed a little modern for the space right in front of the Village, however it made sense for the City. I plan to add wood accents to offset the modern look a bit.


As I assembled the bridge, little things started popping up in my head. Items like pedestrian safety and barriers so cars and people wouldn't just...OOPS it off the roadway into the water. hehehehe These details are being addressed as best I can so that I can look at the bridge without being upset about the flaws. :::grin:::: I'm adding more and more of these safeguards - Phase 02.


 Phase 03 is just another level of details and painting. Photos will follow, of course.

Comments welcome!